Virtualbox has been troublesome on MacOS for a number of years now, due to issues with its support for high resolution displays, like the Retina ones that Macs have had for a long time. If you install a fresh Ubuntu VM, you notice right away that you have a tiny display that is very difficult to read. So you then try adjusting the scaling factor setting in Virtualbox, only to find that the client OS has become very laggy to use. Opening the Activities view in GNOME moves like a slideshow, and even dragging a window around results in unusably slow repainting.
Right click on VirtualBox.app, Show Package Contents.
Contents -> Resources -> VirtualBoxVM.app (right click -> Get info)
Check the “Open in Low Resolution” checkbox.
Run the Virtual Machine in 100% scale mode.
The VM will be correctly sized, and won’t have the excessive repainting lag. This doesn’t fix issues with 3D applications (such as RViz and Gazebo, for Robot Operating System) being incredibly slow, as that’s a different issue, but it’s a huge step in the right direction.
Following my recent dive into server side navmeshes, I quickly discovered some apparent performance issues that could use some investigation. The pathfinding routine seemed to lag for a few seconds before the route was drawn onscreen, and the server startup was also delayed by the graph generation.
Profiling With Stopwatches
My development machine is a MacBook Pro, which presented a limitation in tracking down exactly what was slowing the game down. Microsoft, as it turns out, does not offer a profiler for the .NET platform on Mac OS X. The version of Visual Studio (Community Edition) that is available for Macs is a rebranded Xamarin Studio…which is an improvement over MonoDevelop, what people tended to use with Unity in the past, but it doesn’t have nearly the same feature set as the full Visual Studio for Windows. As far as I can tell, there isn’t such a tool for Macs or Linux at all, aside from JetBrains’ offering in their commercial Rider IDE.
Oh well. I tend to use print-debugging anyway, so it’s not like I can’t easily devise a more manual approach…
Fortunately, C# has a convenient Stopwatch class in the System.Diagnostics package. It’s simple enough to wrap function calls in Start() and Stop() invocations, printing out the elapsed time.
usingSystem.Diagnostics;varwatch=newStopwatch();watch.Start();//do thingwatch.Stop();Console.WriteLine($"Did Thing in {watch.ElapsedMilliseconds}ms");
I already had a good idea about potential slowdowns anyway, so I wrapped timings around a few key functions and ran the server. My findings were a little surprising though.
The Data
When the server started up and the zones loaded, my suspicions were confirmed about the function that connects the polygons up into a graph to pathfind on. The time spent on that step grows very quickly as more objects are added. It only runs once on startup though, so that wasn’t my culprit for the lengthy delays when the paths were drawn.
Neighbor generation for 401 triangles: 58ms
Neighbor generation for 3051 triangles: 3288ms
Next, I kicked off a the FindPath() method and watched the results.
Raycasting for 3051 triangles: 0ms
Raycasting for 3051 triangles: 1ms
Path refinement for 3051 triangles: 0ms
Total pathfinding time for 3051 triangles: 2ms
Wait, that can’t be right. On the larger zone, my pathfinding is still lightning fast!
As it turns out, the apparent sluggishness was actually a result of drawing all of the gizmos on the client. When the gizmo lines for the triangle boundaries are disabled, pathfinding happens immediately on the larger zone.
Speeding up the Start Time
Since I didn’t have to worry about the performance of the pathfinding itself, I decided to work on improving the sluggish graph building step, since that could get to be annoying as more zones are added.
I evaluated a few approaches, chasing that linear growth rate…because that’s just what you do. I was stuck on the idea of using a dictionary to do fast lookups of vertices, so I could trade a bit of temporary memory usage for an algorithm. Sadly, that didn’t work out since I ran into snags no matter which approach I took.
If I used the vertex indices from the OBJ file as my dictionary key, triangles would still not show as neighbors because the OBJ file is perfectly fine with having multiple vertex indices that just so happen to have the exact same coordinates. So Triangle A might have vertices 37 and 38 forming an edge against Triangle B, but the vertices it has are 47 and 49, despite having the exact same coordinates.
Vector3 objects as dictionary keys are straight up not going to work because floating point numbers are a huge pain. Two Vector3s constructed at different times (e.g. the two triangles in the previous example) are distinct objects with unique HashCodes, so the Contains() method in a dictionary won’t be able to find one when given another. You can’t make a custom IEqualityComparer either, even though you could easily implement an Equals() method that checks if vector distance is less than a very small number, because that requires implementing a custom HashCode function. As far as I’m aware, it’s actually not possible to make a reliable hash that provides the same value for floating point numbers that are close to each other but not binary equivalents.
In the end, I thought of a solution that’s good but not perfect. The inner loop of the original algorithm gets transplanted into the place where the OBJ parser instantiates the new triangle object. So the number of iterations of that inner loop increases as more triangles are parsed, but the total iterations are far lower than before. It ends up being about half what the original function had.
I also found an unexpected optimization for the vector equality helper function. Instead of using the built-in vector distance method, return Vector3.DistanceSquared(a, b) < 0.001, I did the math longhand and it actually cut a whole second off of the time.
I’m not sure what Microsoft’s function is doing under the hood, since an additional function call shouldn’t have that kind of overhead…so that was an interesting finding, which I just tried out of curiosity. VEQ(...) is called a total of 12 times in each iteration of the neighbor generation, so it definitely had potential to add up.
That change and the loop reduction together bring the execution time down to 1135ms from 3288ms. I’m definitely happy with that. If it adds up down the line, I can always revisit it again later, rather than going further down the premature optimization rabbit hole now. The way the classes are structured, the loading process is also a potential candidate for Parallel.Foreach.
The important thing is that the part which will be run frequently over the life of the program, the pathfinding, is nice and fast.
Way back in my first devlog post, I talked about designing the Zone architecture. I sketched out the basic server-side concept of an area in the game, with an associated Unity scene and set of players (and eventually Entities like monsters and Non Player Characters). This involved creating a basic exporter to turn the Unity navmesh into an OBJ file, with the end goal of having the basic level geometry on the server, for pathfinding and validation of some player behaviors.
I expected this to be a very involved part of the project, as well as a vital one, but I was surprised to find that there were precious few resources online that even talked about the implementation of navmeshes. You can find lots of pages about using the Unity and Unreal navmesh tools, and things about Valve’s usage of square-based ones in their games, but there are very few articles that discuss their implementation at a theoretical level. So, I had a lot to figure out on my own.
What Exactly is a Navmesh?
A navigation mesh is a simplified form of a video game level, consisting of a single 3D model that represents the places where a character can walk. Basically, it’s your ground, with holes where obstacles would be. This is used with a pathfinding algorithm to allow an NPC to find the shortest path from one coordinate to another, making it a core part of game AI.
Navmeshes are made up of convex polygons, triangles typically, that tesselate to form the surface. Since we mostly experience 3D models in a more or less tangible form, as characters and environments in movies and games, we’re kind of conditioned to think of them as physical objects. However, what they boil down to is simply a list of vertices and the edges connecting them. In fact, that’s exactly how the OBJ file format works: it’s a text-based list of vertex coordinates and a list of vertex triplets that form triangles. When you draw out all of those points and connect them, you get something that looks like a thing.
Where am I going with this? So, we have a bunch of vertices connected by lines. Doesn’t that sound like a different concept that always comes back to haunt Computer Science types? That’s right, graphs. Yep, computer graphics are an expression of mathematical graphs. Whenever a game engine displays a model, it’s just taking a list of points and their relationships and telling the graphics context to draw lines between them. So, if we have a graph, then we know exactly what sort of data structures we can use to hold the data on the server…and we know we can use graph searching algorithms to do pathfinding. Dijkstra, Astar, Depth First Search…we just need to parse the OBJ file into any basic representation of a graph, and then we can traverse it.
Visual Debugging
Before diving into this, I wanted to make sure I had a way to visualize what the server was doing, for debugging purposes. So, I made a new network packet that holds six numbers: the x, y and z coordinates for two points in a line. With the server able to send that, I wrote up a couple of quick functions allowing the client to receive these and add them to a list, drawing them on-screen in the Unity Editor with the “gizmo” feature.
By simply invoking Gizmos.DrawLine(from, to) for each received set, I could have the server draw arbitrary red lines on the client’s screen when the game was run from within Unity. And if you can draw a line, you can draw three lines and make a triangle. Armed with that little quality of life feature, I’d be able to more confidently work on the server side.
Putting Level Geometry on the Server
The Wavefront OBJ format that I use to hold the exported navmesh generated by Unity is very simple in concept. It uses plain text to produce a list of coordinates representing the vertices, and then connects them with a list of triangles that reference the vertices ordinally. Parsing it is then just a matter of string wrangling.
# vertices
v -76 0.55 -102
v -51 0.55 -102
v -51 0.55 -128
...

# triangles
f 1 2 3
...
My goal here was to turn the OBJ file into an in-memory list of triangles, a List<NavMeshTriangle> property in my navmesh class. The triangle class would hold three vectors, each representing a vertex in the triangle.
publicclassNavMeshTriangle{publicVector3A{get;}publicVector3B{get;}publicVector3C{get;}// simplified, omitting some helper methods and properties introduced later...}
The resulting algorithm is surprisingly simple. You load the file and read it line by line, doing the following:
If the first character is a v, split the line on the space character and make a new Vector3 out of the three numbers. Add the Vector3 to a list of vertices.
If the first character is an f, split the line on the space character. Then look up each of the vertex IDs (indexed starting with 1) in the vertex list. i.e. vertices[id1 - 1]. Then construct a new triangle object with the three Vector3s we now have and add it to the triangle list.
Else, this is probably a blank line or a comment, so just ignore the line and continue the loop.
Now if I loop through my triangles, and send those debugging packets I made earlier, drawing A→B, B→C, C→A, I can see my navmesh drawn out in the Unity scene!
On the software architecture side, I did a little bit of planning for the future as well. My NavMeshTerrain class is implementing an interface called ITerrain. The Zone class then has a property ITerrain Terrain to hold the level geometry. I plan to have some zones be procedurally generated, changing from time to time, and those zones may use a completely different sort of data to represent the level geometry. For example, a heightmap generated by the server. So, I created a contract of methods that a terrain must have, and then various terrain types implement those.
Those are two of the main things we want to do with our terrain: tell if a point is traversable or not (i.e. it exists within a triangle in the list) and run a pathfinding algorithm. In order to do either, there’s still more work to do…
Finding the Triangle for a Point
One thing we will need to do frequently is determine whether a given point is traversable or not. Maybe we want to see if the player is standing in a valid location, or if there’s an obstacle preventing some sort of action. Determining traversability on a navmesh more or less means “does this point exist within the bounds of one of the triangles.” Since we have a list of triangles, this means iterating it and performing a geometric algorithm on each one. We will also need to do this as a part of our pathfinding, so we can determine which triangles the start and end coordinates are within.
What we’re trying to do is a “point in triangle test.” There’s an easy approach in the linked page, as well as a faster but more complicated Barycentric technique. There is also a page on the Unity wiki that shows a C# implementation of this test.
Leaning on those resources, I put together a function to determine which triangle, if any, a point is inside, and then wrapped that to implement the PointOnTerrain(...) method.
Connecting the Triangles
You may have noticed that we still don’t have a graph. We have a list of unrelated triangles, which is decidedly not a graph. This list is convenient for searching for a specific triangle, but we need to connect them up to be able to do pathfinding and such. Each triangle object in the list gets a list of neighboring triangles: an Adjacency List.
By prepopulating the adjacency lists when the OBJ file is parsed, we create a data structure that is nice and fast to walk through for pathfinding purposes. With a starting object in hand, you already have the neighbors and those have their neighbors, and you can recursively run through them without doing any further geometric calculations.
But why are we even storing full triangles and trying to determine adjacency? Why not just connect the vertices up with the edges the OBJ file defines, and pathfind on those directly? That’s certainly possible, but the resulting behavior would cause characters to hug walls or take strange back-and-forth paths. The approach I’m going for is to connect the centers of the triangles in a graph and have the character walk from the triangle to the closest point on the shared side of the next triangle, so they walk more naturally.
The function that I wrote to preprocess all of the adjacency lists isn’t the most efficient—it has an apparent time complexity of —but it only runs once on server startup, so I’m willing to leave it be for now instead of prematurely optimizing. If it turns out to be too slow on zones with a higher polygon count, I can certainly improve upon it.
It looks a little messy, but all it’s doing is looping through each triangle and then checking every other triangle to see if it shares two vertices. A triangle that shares two vertices with another triangle must share a side, so it gets added to the Neighbors list.
The VEQ() function tests the equality of Vector3s, as they’re a floating point numbers, which don’t compare cleanly. The server is a .NET Core application using the System.Numerics vectors. Unity might have some tricks up its sleeves for comparing vectors, but Microsoft’s Vector3 implementation will not always equate two vectors even if they should be the same. So, I’m just checking if Vector3.DistanceSquared(a, b) < 0.001.
Now we have a graph.
Pathfinding with A*
With a graph in hand, the overall problem of finding a path from Point A to Point B has become one of the classical Computer Science problems: searching a graph to find the shortest path. This may also bring up unpleasant memories for those of us who sat through Data Structures and Algorithms classes, especially when dropping terms like “Dijkstra’s Algorithm” or the infamous CLRS Introduction to Algorithms textbook…
The A* algorithm is potentially the most popular pathfinding algorithm used for games, because it doesn’t have a lot of moving parts and it’s relatively fast. Developed for a robotics application, it’s more or less an extension of Dijkstra’s famous pathfinding algorithm, but with a heuristic function that “aims” the search to avoid processing nodes that are not vaguely in the direction of the target. While Dijkstra has to search every node in the graph to evaluate the shortest path, A* will run straight toward it and eliminate nodes that aren’t going to get it anywhere.
In each iteration of the algorithm’s main loop, it estimates the cost of the path and tries to minimize the increase of the cost function, which is defined as , where is the cost of the path from the starting node and is the heuristic function, which estimates what the optimal path’s cost “should” be.
Since my graph is inherently made up of geometry, and I already have objects that hold this information for me, I can use the actual distance between the triangles’ center points for my cost functions. First, I needed a helper function to determine the Euclidean distance between two triangles’ centers. (The DistanceSquared(...) method is used to avoid a slow square root operation when calculating the length of a vector.)
I had already defined a CenterPoint() method on the triangle class, which is simply the triangle centroid formula of . So now I can define my function as AstarDist(target, n), as AstarDist(start, n) and as the sum of the other two.
The overview of the A* algorithm is as follows.
While the open set is not empty:
Set the current node to the one in the open set with the lowest cost.
Add the current node to the closed set and remove it from the open set.
If the current node is the target node, prepare the path and return it.
For every neighbor in the current node:
Skip the iteration if the current node is in the closed set.
If or if the neighbor is not in the open set: store the fact that we came from the current node to get to the neighbor node. If the open set does not contain the neighbor node, add it.
The “came from” part is often referred to as “parenting” one node to the other, and is how you walk through and produce a path after the algorithm is done. Often this is done by actually putting a “parent” property on the nodes, but I intentionally chose to not mutate the nodes. Instead, I have a dictionary called cameFrom that uses a triangle node as the key, and another as its value. When we reach the condition in step three, where the current node is the target node, I start with the target node and do this:
varpath=newList<NavMeshTriangle>();varn=end;while(n!=start){path.Add(n);n=cameFrom[n];//set the next n to the parent node}path.Reverse();returnpath;
That way I keep the NavMeshTriangle unchanged because this operation will be run frequently and keeping state out of the geometry objects will be important.
Another consideration is the type of data structures used for the sets. The open set is a List (backed by an array in C#), because we need to address nodes by index in the main loop, but the closed set is a HashSet. closedSet.contains(...) is called three times in the neighbor-checking loop, while we never call that method on the open set, so optimizing it by using a proper set structure is sensible.
All in all, A* is fairly straightforward to implement if you have some familiarity with graph traversal, and there are tons of examples online in every imaginable language. It’s mostly just a case of tweaking the basics for your use case and graph implementation.
With all of that done, we can now find paths between two points!
As you can see in the above image, the path looks a bit too zig-zaggy. What we’ve done so far is to generate a coarse path, using the triangles on the mesh as our pathfinding nodes. However, walking from center-to-center is a bit awkward, obviously. Now that we have the collection of triangles to pass through, we can look at refining the path by walking to the closest point on each shared edge, producing a straighter path. However, there’s a slight detour to be made first…
Raycasting to Improve Triangle Searching
In testing the pathfinding, I noticed that the whole thing doesn’t work if the coordinate used is not precisely on the same plane as the triangle being searched. While this works just fine on our ground level, if I try to pathfind up the stairs, the coordinates are not going to line up, since the player model doesn’t stand perfectly on top of the stair mesh. So instead of checking triangles with just the point-in-triangle test, I’m going to have to do some raycasting.
Finding the point where a ray cast out from an origin hits a triangle is a well-tread problem, one that is core to computer graphics. The basic idea is to produce a plane from the points on the triangle (a surface that has an orientation but extends to infinity on each side) and figure out the point where a ray (origin point and direction) intersects the plane. Then that point can be fed to the same point-in-triangle function to establish whether the raycast hit is within the triangle or not.
After hacking at it myself for a few hours, I found an excellent article that provides a more thorough explanation of the solution and a more succinct approach to implementing it. I ended up adapting their approach to finding the intersection point on the plane, and then fed that to my existing point-in-triangle test.
I also updated my triangle class again. I already had a Normal() method that would return a vector for the triangle’s surface normal (cross product of two edge vectors), but I ended up caching that as a property when the object is instantiated. I also added an Area property at the same time (length of the normal vector).
Now to actually use the new function: when searching for a triangle by a point, I call RayHitsTriangle(...) with the desired point, but with a y value two units higher, and a downward ray direction of Vector3(0, -1, 0).
With that finished, paths are now working properly at different heights and angles.
Now we can get back to making the path less zig-zaggy.
Refining the Triangle Path with Edge-to-Edge Movement
While the A* algorithm is finding a path through our triangle nodes, we don’t actually want to walk to the center of each triangle. The triangles vary in size, and can be quite large, so walking to the center can often mean taking quite a long walk out of your way. What we really want is to walk to the nearest point on the shared edge of two triangles.
This basically works by finding the shared edge (two identical points shared between a triangle and the next) and finding the nearest point along it, treating it as a line segment. This is how I ended up approaching it:
The t variable ends up being a fraction of the line segment’s length, which is multiplied against the line segment magnitude to get the final point. It seems to work all right. As you can see below, it is already straightening the path out quite a bit.
Now, there are still more points than we really need, and the path could still be a lot straighter. If you have a line of sight to your destination, you really want to just walk in a straight line. So, I put together a simple pruning algorithm that iterates the points and does a line of sight check on each subsequent point, only adding points to the pruned path if the line of sight check fails.
The line of sight check is testing for the intersection of two line segments, one representing a line between the two path points and the other being a triangle edge that is “obstacle.” An edge is an obstacle edge if it is not shared with another triangle.
With that change in place, it’s looking just about perfect.
Another minor refinement I made in the FindPath(...) wrapper method is to skip pathfinding altogether if the starting and destination points reside in the same triangle, because then you can just go in a straight line.
After about four weeks of working on pathfinding, I think it’s finally in a state where I’m happy with it for now. Since I knew it was going to be one of the more complicated parts of this project, I wanted to make sure I got it done over the summer before I had classes to distract me again.
Of course, there is still some more to be done on server-side geometry issues. I did think to test the pathfinding with a scene that features a one square kilometer terrain object, with some quick mountains and such painted on. It worked fine, after a little bit of debugging to smooth out some minor glitches with the raycasting and a bug or two with the player spawning in a new zone, but there are some definite performance issues to address.
A larger zone with a ground that isn’t simply a plane ends up having many more triangles (the navmesh Unity generated has several thousand) and this is noticeably slow for pathfinding…as well as taking several seconds to generate the neighbor properties on the triangle objects. Again, that latter one isn’t the end of the world (but it would be nice to improve upon). However, it’s important that the actual pathfinding process be reasonably fast, so further investigation on that front is necessary.
Edit: After some investigation, it turns out that the apparent sluggishness is a result of the debugging tool drawing too many gizmo lines on the client. The pathfinding is actually lightning fast.
Beyond performance, a later step will probably be to implement some functionality for placing Unity’s colliders on the server as well, so we can do raycast tests to see if enemies can see a player or if a player has line-of-sight to shoot a spell. My as-of-yet undeveloped plan is to build another exporter that will read the colliders’ shape and dimensions and produce another OBJ file for these static objects. Then the server can import that file and use the geometry for simple raycast tests.
Back to Chat: Tab Completion and Teleportation Commands
Before starting this major endeavor, I finished up some loose ends for the chat and command system. Most notably, I implemented a simple autocomplete system for player names and subcommands. Typing out a player’s full name is tedious, especially when direct messaging several players, and it would definitely be nice to avoid that. So, by default, if you type out a few letters and press tab, the game will autocomplete to the first online player that matches. In addition to this functionality, each command has the opportunity to override a TabComplete() method from the superclass, so completions can be applied to things like subcommands as well. Basically, it works like a simplistic version of the completion you get in a shell like Bash.
When the user presses the tab key, a packet is sent to the server with a string containing all of the text to the left of the insertion point. The server looks up the command (which might just be /say) and invokes its TabComplete() method, whether it’s explicitly defined by the command or the player name one inherited from the base Command class. This involves some string-wrangling, and then function spits out the completion text and we can get back to the fun part.
The server eventually sends this packet back to the client:
We’ve got the original text the client sent in its request packet, a starting index that defines where in the string the replacement begins, and the text to replace. Then it’s a simple matter of doing a Substring() replacement on the input field’s text object and then moving the caret to the new end of the string.
I also added some basic teleportation commands for debugging and moderation tasks. A /tpzone command moves the player from one zone to another, and a /tp command allows you to move yourself or another player to specified coordinates within the current zone. Mostly I’m using these to move clients around for testing purposes, and as a way to verify that my permissions scheme works correctly, but they could potentially be used in a live game to unstick players or for moderators to more easily move between areas to observe. (In a similar vein, I also implemented a /kick command that boots the named character from the server.)
Minor Bug Fixes
Properly despawn characters on the client when the relevant packet is received.
Properly despawn players from the server when their clients disconnect.
Return to the login menu when the connection to the server times out.
Fixed an issue where the chat input would be unexpectedly focused.
One of the most important parts of an MMORPG is chat. Being able to interact with other players is a a staple feature of the genre, and it’s essential to have any sort of community aspect. As far back as MUDs, the ancestor of the modern MMORPG, just hanging out and talking to people has been a core part of the online role playing game experience. A chat system also serves as a means of command input, which is useful for functionality that doesn’t need its own GUI…or moderation tools.
Network Packets
I went back and forth quite a bit with my initial planning for the networking side of the chat system. I initially wanted to combine the system backing the garden variety chat pane with the structure that would eventually be required for things like NPC dialogue, which would require a more flexible schema to accommodate various metadata values in addition to the body text. In the end, I realized that was really best left as a separate concern and decided that command and response packets should be kept simple for now.
The scheme I arrived at is akin to RPC. The server treats anything coming in from the client as a command, dispatching it to the appropriate class in the command manager and delegating any further responsibility to the corresponding command class. The server can, at any time, send a chat packet to a client and the contents will be rendered in its chat lane. When the user types a message into the chat input and does not prefix it with a slash character and command name, the client assumes they’re just chatting to players in the zone and prefixes the message with /say. The (LiteNetLib) packet classes backing this are basically just wrapping a single string value.
Chat packets can contain Unity rich text markup, allowing the server to colorize text or use bold and italic type. Incoming commands are run through a basic sanitizing routine to make sure a player cannot insert the tags for nefarious reasons. (It’s just a simple, but thorough, regex since the syntax is far more limited than something like HTML.)
Designing the UI
The chat pane is made of two basic Unity UI elements: a text input field and a scroll view, each with a small script component to add the desired behavior. The text input is the simplest, listening for presses of the return key and focusing/unfocusing the field programmatically. This hooks into the character controller to freeze player movement while the field is focused, unfreezing it and dispatching the appropriate packet when the user presses the key again to send the message.
The scroll view is a bit more finicky, and relies on some included layout components to create the desired behavior. The scroll view effectively operates by dynamically repositioning a child view and clipping it at the top and bottom bounds of the parent view.
If you look up basic examples of how to use Unity scroll views, they usually focus on using a single text label as the content being scrolled. This doesn’t work well for a chat UI, despite its apparent simplicity, for two reasons: first, we need to be able to remove older messages instead of adding onto the label forever. More importantly, Unity labels do not automatically change their dimensions to fit their content when you append text, at least in a way that plays nicely with the scroll view. Plus, we’d ideally like to have some control over the margins between chat messages.
The most elegant solution is to take the Content object, a Rect, which is basically just a holder for a transform, and apply the included “Content Size Filter” and “Vertical Layout Group” components. These together will make the Rect Transform expand in a predictable way, and automatically arrange child objects that are added. It took a little bit of trial and error to get everything to play nice, but the end result is that any prefab instantiated and made a child of the Content object will be vertically stacked.
With that in place, all that’s needed is a simple prefab of a text label. Whenever a chat packet comes in, a listener in the chat pane’s MonoBehaviour instantiates the prefab, sets its parents to the Content view, and then sets the text to the string value from the network packet. The text’s paragraph style is set to wrap horizontally and overflow vertically, so the label will expand.
When instantiating the prefabs, they’re also pushed onto a queue, with the oldest dequeued when there are more than a configurable number in the queue. This keeps the scrollback from growing endlessly and becoming unmanagable.
Command Framework
The whole system revolves around a simple abstract Command class with a handful of properties that implementations set.
The heart of the class is the abstract Execute() method, which is overridden by any implementing class. When a command comes in, the command manager looks up the appropriate class, in its dictionary of registered commands, and invokes its Execute() method. You might recognize this as the Visitor design pattern.
Most of the properties are fairly self-explanatory, with permission being an enum of appropriate roles that command access may be limited to. The HasPermission(Client client) method exposes an easy way to verify that the issuing client has access to the command.
The aliases list allows a command to optionally provide alternate names that it may be invoked with, which are added to the command manager’s map upon registration. This way commands like /say can have short versions, such as /s.
The CommandManager is, at its simplest, a Dictionary mapping command names (or aliases) to their appropriate handler classes. A Register() method takes care of inserting the commands and making sure the aliases are added as well, and the basic commands are registered when the manager is instantiated. (However, it’s certainly possible for commands to be registered from elsewhere, perhaps in some sort of module/plugin system.)
Whenever a command packet is received, the server calls the CommandManager’s Dispatch method, supplying the Client issuing the command as well as the raw string from the packet. The function does some normalizing, ensuring the leading slash is removed and splitting the string into a command name and an array of arguments, much like we’d expect from a shell environment. The method then tries to find the appropriate command class, does a permission check, and runs the arguments through a basic sanitizing function to ensure that there are no Unity Rich Text tags. If everything checks out, the command class’s Execute method is called. otherwise, an appropriate error message is sent back in the form of a red-colored chat packet.
Basic Commands
I already implemented a few basic commands, allowing for basic chatting in the same zone or directly messaging players. The /say command illustrates the basic structure of a simple command, and is the command that is automatically sent by the client if the user does not prepend a slash to the string they enter into the chat input field.
publicclassSayCommand:Command{publicSayCommand():base("say"){usage="/say <message>";description="Sends a chat message to everyone in the Zone.";permission=PermisionLevel.DEFAULT;aliases.add("s");}publicoverrideboolExecute(Clientclient,string[]args){varzone=client.player.GetZone();varmsg=string.Join(" ",args);foreach(Playerpinzone.Players){p.SendChatMessage($"{client.player.Name}: {msg}");}}}
There is also a corresponding /me command for roleplaying messages or the fine IRC tradition of trout-slapping.
Direct messages are mostly implemented as well. You can target a message to a player with a command in the form of /msg <firstname> <lastname> <msg>. Whenever you send a message to another player, or receive one, a property is set that enables the /r <msg> command to automatically reply to the correct player, keeping the conversation going without having to deal with the cumbersome name each time.
I’ve been taking an astronomy class at my university this semester, mostly to knock out some gen-ed credit requirements, but also because it’s fun and interesting. While we still have some socially-distanced labs in person, telescope time is an issue that has been solved with something potentially even cooler: Slooh.
Slooh.com is a subscription service that gives you remote access to several telescopes in the Canary Islands and Chile, allowing you to select positions and capture photos. (The name comes from “slew,” referring to the adjustment of a telescope’s orientation.) It’s been around for about 17 years, but this is the first time I’ve come across the service.
Image of the Orion Nebula (M42), located south of Orion’s Belt.
Chile Three: Lunar and Planetary Schmidt-Cassegrain Catadioptric EdgeHD equipped with a high framerate video camera for lunar photography
The starting cost is $100/year, with a 50% discount for students. That lets you queue “missions” to any of 1000 catalogued objects with a few clicks. (People who actually know what they’re doing, and are willing to pay for higher pricing tiers, can gain a bit more control.) It’s a fantastic offering, being able to have even limited use of large, high-quality telescopes located in some of the best places in the world for capturing astronomical images.
It’s been a few months since my last entry, as expected. School and some medical things kept me busy for most of that time, but I finally got to work on the game a bit while isolating for the start of the new semester, and have kept at it since. Most of this round of progress happened over a three week span, and I’ll probably keep picking at it until homework levels ramp up again.
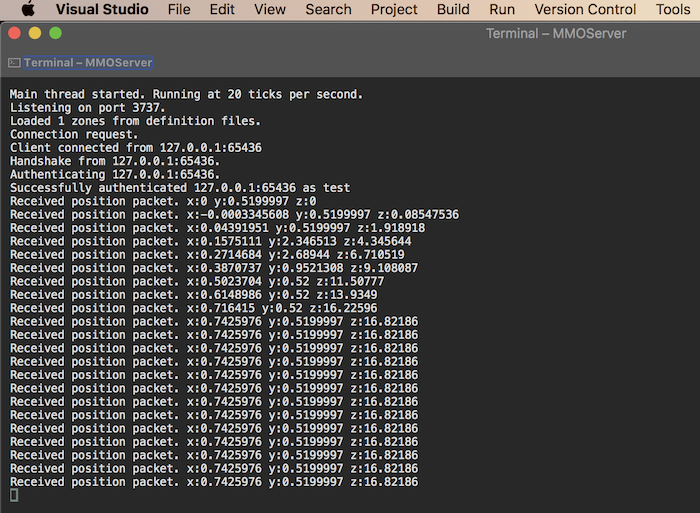
The big thing this time is synchronizing player positions and rotations over the network. It’s finally working, so I’m going to go over the major steps in getting this crucial feature up and running.
Sending Client Movement
The first order of business was picking up where I had left off: I had a working player controller, and the server could successfully instruct the client to load a zone and spawn the player prefab. So, the next step was taking the player’s movement and sending it to the server in a stream of packets.
The general plan, as I mentioned in my previous entry, is a fairly simplistic model along the lines of what you see in Minecraft or World of Warcraft. (My past experience making Bukkit plugins for Minecraft probably had an influence on my design decisions, as well as the simplicity.)
The client sends a packet, n times per second, containing the new position and rotation
The server checks the Euclidean distance between the last location and the new one. If it’s further than expected, it refuses to update the position and sends the client a reset packet that “rubber bands” the player back to the last known good position. Otherwise, the Player model’s position and rotation properties are updated.
If the player is stationary, the client only sends the packet once per second.
I’ve tweaked the send rate a little while working on this. Currently, I’ve settled on 5Hz, which seems sufficient for an RPG type game. It’s also fairly easy to adjust later, if necessary.
Eventually, I’ll probably add some additional anti-cheating checks…like ensuring the client doesn’t fudge the vertical component of the position in order to fly.
Broadcasting Positions to All Clients
Now that the server knows where everyone is, it needs to tell the clients.
In Untitled MMO Project, the server considers Players to be children of the Zone they are in. The overall design makes it easy enough to get the Player (or its network client object) from anywhere, but the Player’s Update() method is called from within the Zone’s Update(). This seemed like a sensible design, because it means we get some nice features for free: any player state packets, such as movement, are conveniently isolated to the only place they are relevant. If a player is AFK in a tavern on one side of the world, they don’t need to know what another player is doing in the mines somewhere else. It also means we have a convenient list of everyone in the same locale, which we probably need more often than a list of every player connected to the server.
The actual broadcast method simply iterates all clients in the zone, then sends a packet to each for every other player in the zone. It also does a check to get which server tick we’re on, out of each second, and returns early if it’s not on the list of ones that we want to send packets on. (The goal is 5Hz, not on every single tick.)
Later on, I came back to this and added some additional bandwidth-saving:
If a player is stationary, its position will only be broadcast once per second. (To match the client behavior.)
If a player is further than a certain (configurable) distance from the client being notified, the position will only be sent once per second. So, the client is notified of movement changes at the full rate when players are nearby, but if they’re far away, fewer packets will be sent. The resolution of the movement is less important at a distance, and it saves a bit of bandwidth.
Spawning Remote Characters
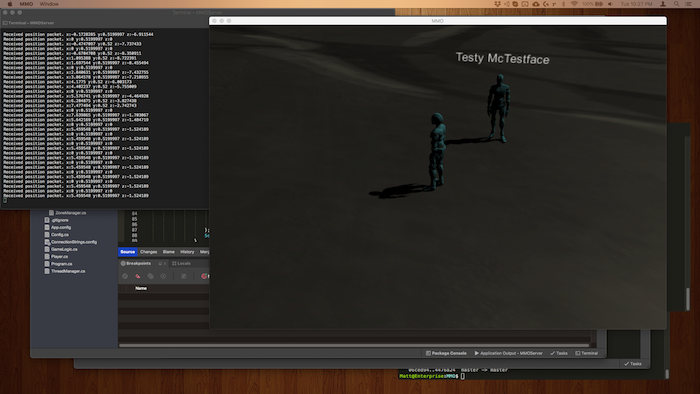
Now our client can tell the server where it is and is kept up to date on where other clients are. The next step is to actually spawn player prefabs in for the other players, and update their position as packets come in. Then we can finally see the whole thing in action.
On the server side, it’s a simple matter of hooking another packet-launching method in where players enter the zone. When a player spawns, all the other clients are notified with a packet indicating that a new player has arrived, with identification and state. The client is where things get more involved.
First, I needed a Unity prefab for the character. I copied my LocalPlayer one, which uses a stock model and animations from Adobe Mixamo, and tweaked it a little before naming it RemotePlayer. The components for turning user input into movement were removed, among other things, and I added a floating TextMesh to be the name plate.
One weird quirk of Unity’s asset management is that you can only use the Instantiate() function on assets that are inside a Resources directory. It won’t work on any others. This has something to do with the way Unity only includes assets that are physically present within a scene, to keep disk usage under control. If an asset is under Resources, it will be included regardless of being present in a scene.
With the object dynamically instantiated, I then set the TextMesh’s value. I also put a reference to the GameObject into a list in a class that deals with scene state. That way, whenever I need to iterate players and update them, I can just hit that list instead of having to traverse scene transforms…which I’m sure is much slower, as well as less convenient.
Bonus: the player’s nameplate really needs to face the camera at all times. Have you ever played a game where you have to walk in a circle around a player to see their name? That would be silly. Fortunately, it’s a simple matter of copying the camera’s rotation to the transform of the TextMesh.
// Make the nameplate face the cameraNamePlate.transform.rotation=Cam.transform.rotation;
This could also be used for a DOOM-style game, where the characters are 2D sprites in a 3D world. You’d just put the flat images onto plane objects, and keep their rotation synchronized with the camera orientation.
With all that done, we’re now at a place where you can connect a second client and see it walk around.
Smoothing Out the Movement
As things stand, we have achieved networked player movement. Unfortunately, the players are just teleporting from place to place as the packets come in. At five packets per second, it’s very noticeable. And with some lag, it gets even worse.
That’s where our friend Linear Interpolation (Lerp) comes in. Getting this right was one of the most time-consuming parts of this batch of work. In principle, we want to take our current position and target position, and smoothly slide from one to the other, over a duration that is roughly in line with the time between the packets. This creates the illusion of continuous movement, and fails somewhat gracefully when the time between successfully delivered packets isn’t optimal.
Initially, I was over-engineering things. I had a queue for the packets and had tried a whole mess of different ways to calculate the t value. Eventually, I came to a much simpler solution that works without all of the mess: store the latest packet and the time (frame count) it was received, as well as the pair from the prior packet.
I’ve been fascinated by the idea of developing games since I first started teaching myself to program around the age of ten. Of course, way back in the early 2000s, we didn’t have the wealth of freely-available game engines with fancy rapid prototyping. Big names like Unreal or idtech3 cost a lot of money, and you were almost certainly going to have to be familiar with C++ to hack even simple things together. That’s a tall order for a kid, especially when you’re more familiar with the likes of PHP and JavaScript (yuck). So I didn’t really get into game development back then (though I have played around a little with Unity in recent years), but I did read about the topic quite a bit.
One thing stuck with me, as I read forums or the limited books that I could get my hands on through interlibrary loans: everyone always laid on thick that MMORPGs, which were the hottest genre at the time, were “too complicated” for the hobbyist. Obviously, that wasn’t something you wanted to hear when you were spending too many hours playing RuneScape and frequently read about EverQuest and World of Warcraft.
They did make a reasonable point. An MMORPG is a massive undertaking for a beginner, since it involves a reasonable knowledge of many deep topics, such as networking, concurrency and databases. The thing is…that doesn’t preclude the possibility of a sufficiently knowledgeable hobbyist pulling it off. In fact, Ultima Online was initially produced by a team of 4-5 people and the original incarnation of RuneScape was the work of two brothers.
So, I decided “why not?” I’m on my third year of a Computer Science degree; I can do this. I had some free time while self-isolating before university classes started back up, so I started planning out a hobby MMORPG.
I figured it would be a fun thing to play with over time. Probably a very long time. Maybe it’ll be an actual live game someday, or maybe I’ll get bored and dump the source on GitHub down the line. Either way, it’ll be an interesting project whenever I have some time.
Without further ado, here are some highlights from the first month of development.
Networking Scaffold
The first few days were mostly spent on networking. I immediately rejected any of the high-level tools that involve running Unity on the server, planning from the start to have a custom dedicated server. I fired up a test project and spent some time experimenting with raw C# sockets, until I had the basic concepts down, but ultimately decided to use a lightweight framework to simplify some things.
LiteNetLib, the library I chose, uses UDP but has support for TCP-style reliable/ordered packets and takes the pain out of serialization. You get a lot of features for free, but it just does networking. Nothing fancy or inherently game related. Its NetPacketProcessor class handles routing, so you can easily define methods to invoke when packets come in, and the serialization tools allow you to define packets as plain classes.
Once I had that figured out, I started scaffolding the server out, then created my MMORPG project in Unity and wrote some scripts to connect to the server.
Authentication
This one is something you won’t see game-related things online talk about, but it’s very important. You need to have a way for users to log in, and you need to do so in a way that does not expose their passwords. Not only do you need to have hashing for the passwords, instead of storing them in plaintext, but you also need encryption while the password is in transit.
For hashing, .NET Core includes functions that do the job. The overall process works the same as any Web application: hash the password and store it in the database when the user registers, then on log in attempts you hash the password submitted and see if it matches.
But that’s not really enough. We don’t want to risk someone sniffing packets and hijacking users’ accounts, do we? The contents of sensitive packets, such as the authentication packet, need to be encrypted in flight. Some games encrypt everything, others don’t. LiteNetLib has already made the opinionated decision to not use encryption, which means you have to encrypt the data before building the packet, as opposed to having the socket’s transport taking care of it.
Fortunately, .NET Core also has RSA encryption in its standard library. If you’re not familiar with public-key encryption, not to worry. Unlike hashes, which only work one-way, RSA is symmetric. Each party has two keys, one public and one private. If you have someone’s public key, you can use it in tandem with your private key to produce a message that cannot be read by anyone who lacks the other half of the recipient’s key-pair. So the process the game uses follows this workflow:
When the server starts up, it generates its private and public key.
When a client wants to connect, the client opens a socket connection to the server and sends a packet asking to authenticate.
The server sends back a packet containing its public key.
The client takes the private key it generates and uses it with the server’s public key to encrypt the username and password to be sent.
The server uses its private key to decrypt the incoming message.
The server queries the database for a row matching the username, hashes the password in the login attempt, and checks to see if the two hashes matched. If they do, a success message is sent back…otherwise the client is kicked.
Git!
Right around now, I started having that nagging feeling that I had gone far too long without an off-site backup. I had already been using Git locally since the beginning, obviously, but I really needed to be able to push it to a remote repo and make sure I had more than the copy on my laptop.
How to Git with Unity tells you everything you need to know about making Unity play nicely with Git. It gives you some configurations that make sure data is serialized in plain text instead of binary, so your changes can be tracked, as well as LFS details and a .gitignore. Git LFS helps Git deal with the large assets that games may have.
Since GitHub’s LFS offerings cost a bit, and I already have a server, I installed Gitea. It has the core features you’d expect from a GitHub alternative, and you can choose to either store LFS objects locally or to outsource them to Amazon S3. My VPS’s SSD space is bigger than I’m likely to need, but it’s nice to have that option.
Database
With an authentication system working, albeit with a hard-coded test username and password, the next logical step was to create a database that would hold the user account information…and a separate one for the game world. By having them split, it would make it easier to support multiple servers down the line.
Not being terribly familiar with the C# ecosystem, I had to do a bit of searching before settling on a plan for the database. I knew I wanted an ORM of some kind, since I’d eventually have many different sorts of data to persist. I also wanted to, ideally, use SQLite for easier development and be able to later switch over to MySQL or PostgreSQL for production.
I briefly looked at the Dapper micro-ORM, but settled on Microsoft’s own Entity Framework Core, because I wanted migrations and other things it comes with. Whether that decision will work out or not is a question for the future, but so far it seems to work just fine.
The running theme seems to be that the server does a lot of the same things as a large Web application. You model data, shuffle it to and from a database, and talk with clients over an API. The only difference is you’re using an open UDP socket with purpose-built packets instead of something like REST over HTTP.
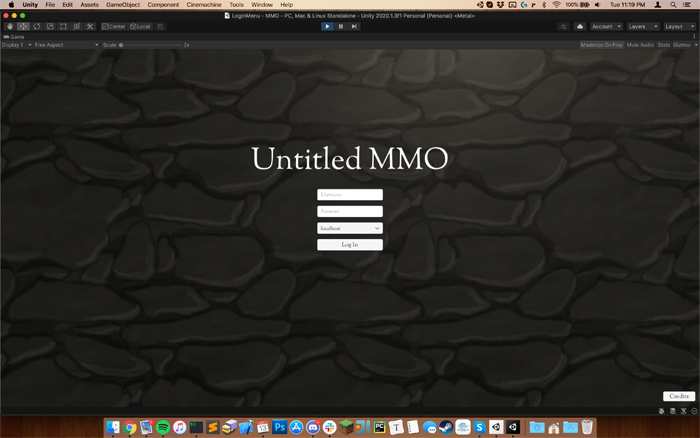
Login Menu and Character Selection
Now it’s time to do some work on the client. When you start the game, the first Scene loaded by Unity is the Login Menu. Attempting to join the game fires off the packet exchange detailed above in the Authentication section.
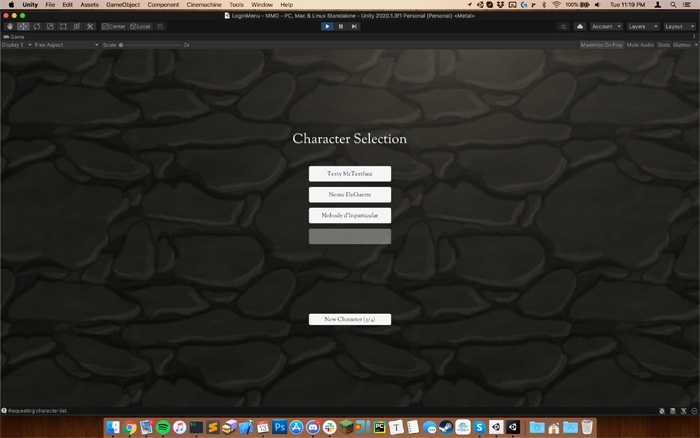
Upon successful authentication, the server dispatches a packet with a list of the user’s characters. When it’s received by the client, the menu changes to show a list of characters to choose. Currently there is no way to add a character other than editing the database, since that will probably involve having more of an idea how character customization might work…
When a player is selected, a packet is sent to the server to join the game, and the server responds by sending a player spawn packet. This commands the client to load a Scene by name, including the coordinates and rotation.
Zone Architecture
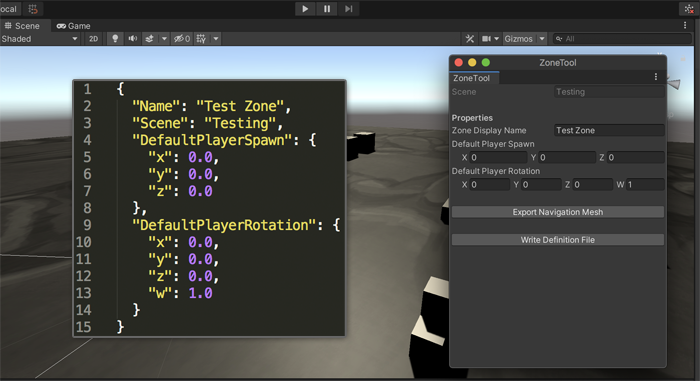
Zones are a server-side concept that section off parts of the world. Each zone has a Unity Scene associated with it, a list of players in the zone, a list of entities (mobs and NPCs, eventually), and other data. Each zone is defined by a JSON file that contains the relevant information.
Every time the server loop ticks (a fixed number of times per second), it calls each zone’s Update() method, which is responsible for updating all or some of the entities contained within. So it might run mob behaviors near players or do nothing at all if the zone is empty. Every n ticks, player data (e.g. location) will also be persisted to the database.
I developed an editor tool that will automatically generate zone definition files based on input configuration. It’s just the absolute basics right now, but eventually it will be expanded as new features are implemented. For example, exits to other zones may be defined with boundaries in-editor, and the zone definition tool will serialize those as well. NPC spawn points will also be marked in a similar fashion.
The zone tool also has a utility that extracts the vertices and triangles from Unity’s navmesh and writes it out to an OBJ file that can also be copied to the server. This is how mobs and NPCs will be able to pathfind, since that has to be done server-side. It could also be used to check if ranged abilities are obstructed by walls.
The base Zone class is also meant to be inheritable, to support special Zones with procedurally generated content. This factors greatly into the premise I’ve been kicking around for the game.
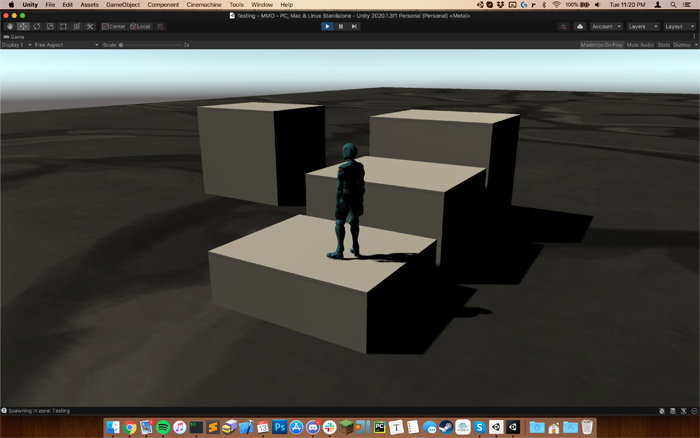
Player Spawning and Controller
So far, the spawn packet works as expected, using information stored in the database. However, I have not yet fully implemented the logic to handle movement requests from the connected clients. The player can walk around using a basic third person controller, but nothing is sent to the server. I have it planned out on paper, but haven’t finished programming it.
The basic idea for movement is for the client to send updates, multiple times per second, of where the client is moving to. The Euclidean distance between the two points can then be checked to ensure that the player is not moving too far between update intervals. If the delta is greater than the cutoff, the location is reset, and the client will “rubberband” back. This (relatively simple) method is commonly used for games where player movement isn’t a gamebreaking issue, as far as cheating goes. (Minecraft and World of Warcraft operate similarly.)
The method that is increasingly common in fast-faced games, like First Person Shooters, is for the client to send a unit vector of the player’s input to the server, which then calculates the movement update (multiplying the vector by the time difference and legal movement speed) and then commands the client to move the player. Since this is very latency sensitive, they interpolate and predict what the server would do so it looks less stuttery when ping time is reasonably low. (But a little lag still throws it all off.) This is a lot more complicated, and definitely worth it for some games, but overkill for something like this.
With either method, the server is the source of truth and has the final say.
For testing purposes, I’m using a model from Adobe Mixamo with some of the included animations. I’m also using a basic movement controller that allows for jumping, and the Cinemachine package is handling camera movement. This will all replaced/tweaked over time, but I needed something to start with while working on the more interesting parts.
Conclusion
Everything is very iterative, and the project definitely does have a huge scope. It should keep me busy and scratch the recurring itch to make Minecraft server plugins. Why hack together mods for someone else’s game when you can make your own? I have a notebook slowly filling with plans for facets of the system, sketches of zones and a rough premise. It’ll be fun to slowly realize that vision.
I will probably post sporadic updates when I do something new and interesting.
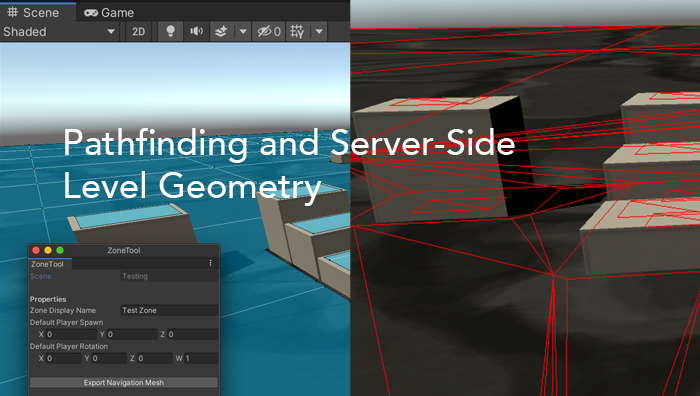
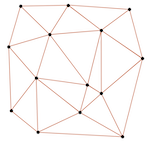
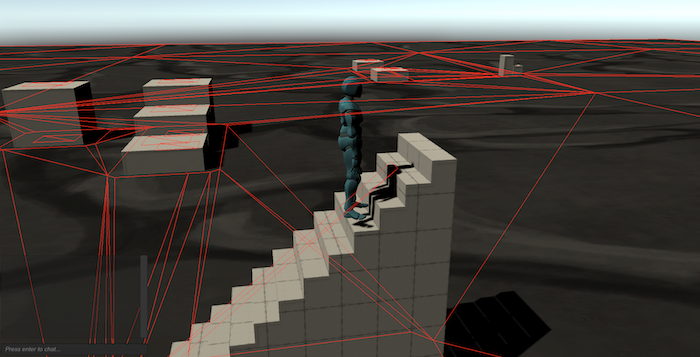
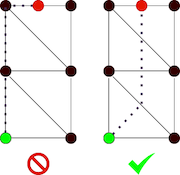
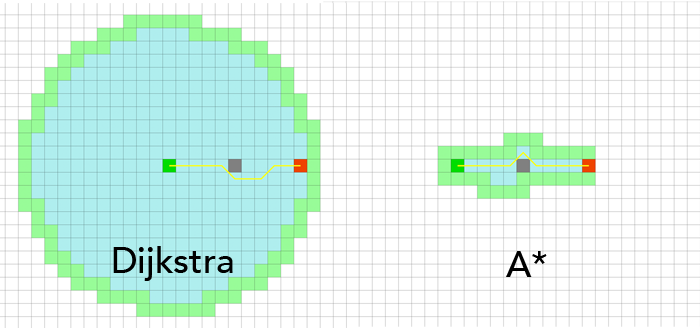
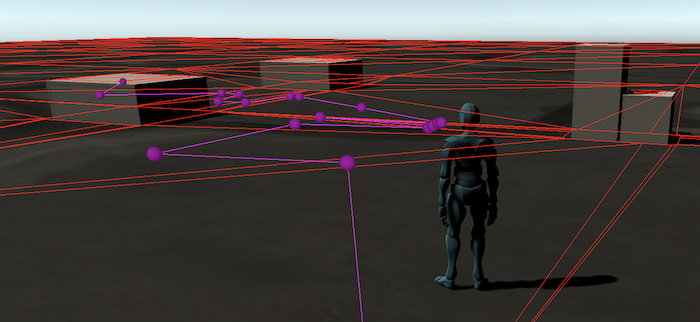
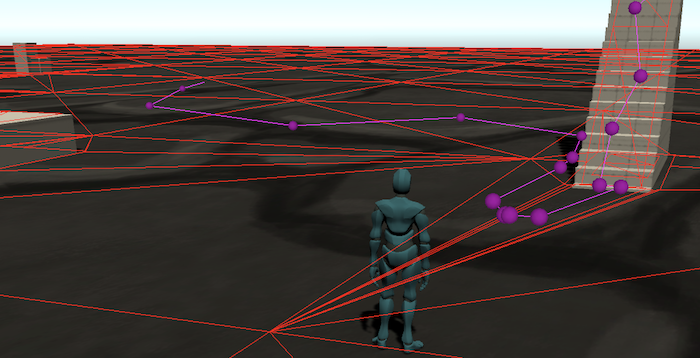
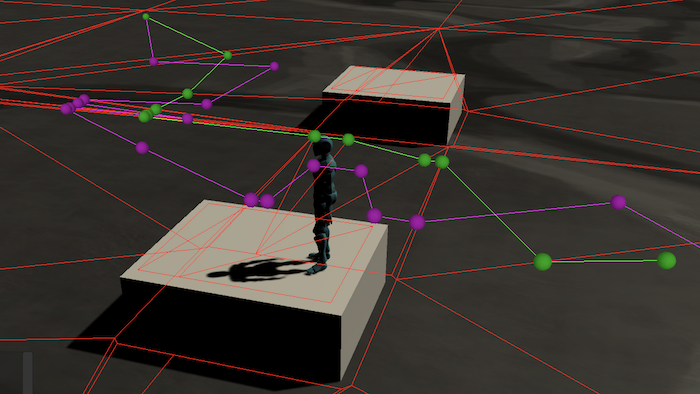

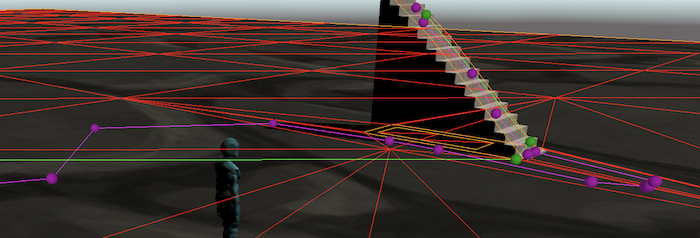
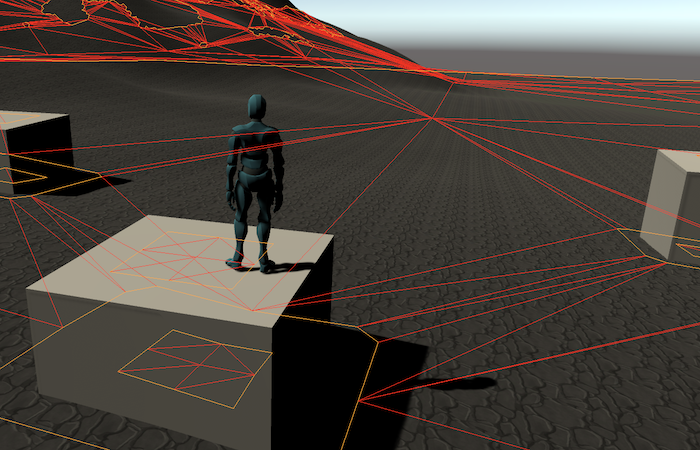
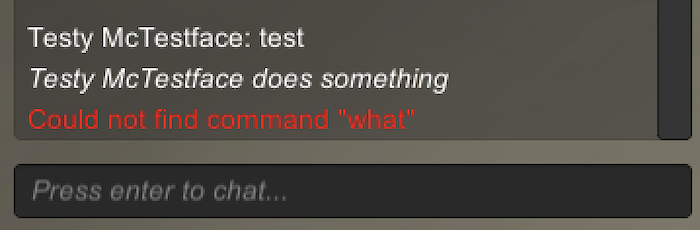
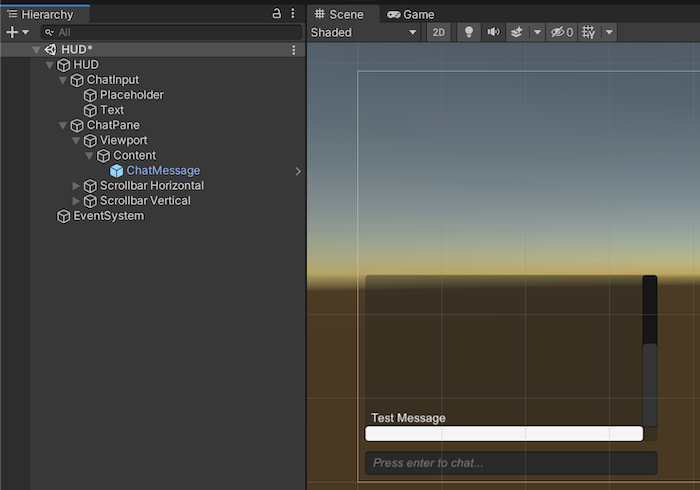
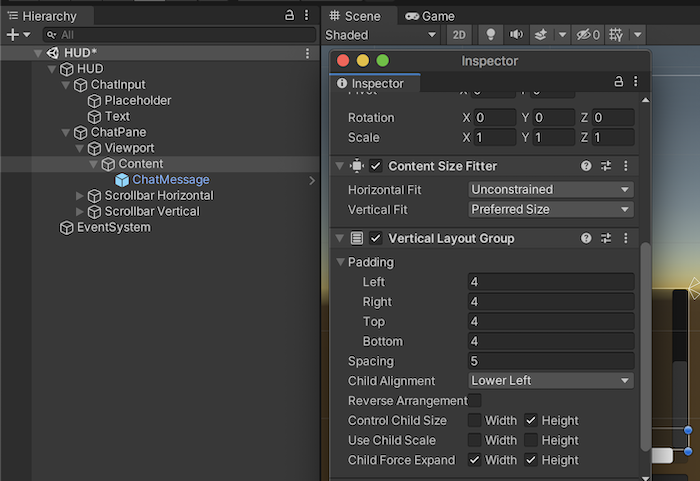
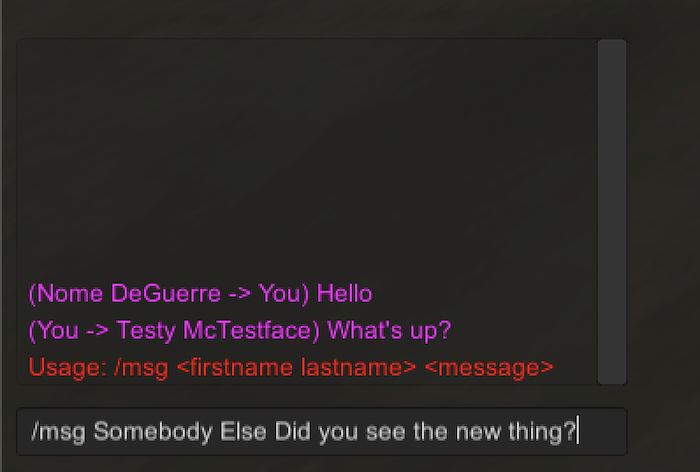
 Image of the Orion Nebula (M42), located south of Orion’s Belt.